A bumpy, lumpy, groove-ridden yard that looks more like a battlefield than something you’d practice your putting on is not only unsightly but notoriously difficult to maintain. While a professional landscaper could do the job of backyard leveling for you, in this article we’re going to show you how to level your backyard all on your lonesome and on the cheap in seven easy steps.

Before that, let’s take a look at a few questions you might have about leveling your yard and yard grading.
Table of Contents
Should I Try to Level My Yard Alone?
Paying a professional to level your backyard could cost anything between $1,000 and $2,000, depending on the size of your yard. If you choose to take on the task of leveling an uneven lawn on your lonesome, however, it should cost no more than $500, even if you have to buy or rent new equipment, but is far more likely to be closer to $100 if you are resourceful and make do with DIY landscaping equipment (see below).
In addition to the savings you can make by going at this lawn care alone, the other considerations are the difficulty involved and time. While some of the stages described below require a fair amount of manual effort, for any moderately fit person capable of handling a rake and shovel this should not be prohibitive.
How long it will take you to complete the job will naturally depend on your own pace, the size of your yard, and just how uneven your lawn is. Even if you happen to work at a very leisurely pace, however, the job shouldn’t take more than a day or two. As a ballpark guide, you should plan on taking roughly one full day of work per 300/400 square feet of lawn.
What’s the Difference Between Grading and Leveling?
Although some gardeners use ‘grading’ and ‘leveling’ interchangeably, there is, in fact, a distinct and important difference between the two:
Grading refers to sloping your yard away from the foundation of your home so any excess water will drain properly and away from your home. This not only helps prevent the lawn from becoming waterlogged in spells of heavy rainfall but also protects your house and its foundations from potentially damaging exposure to excess moisture.
Leveling your lawn or yard area refers to making the surface area smooth and bump-free. While primarily aesthetic, leveling your lawn can also help to prevent other problems like improper drainage, pooling (which can lead to outbursts of weeds and attract mosquitoes), and scalped areas where your lawnmower blades scrape over bumps or hillocks.
How to Level Your Backyard: 8 Easy Steps
Step 1: Collect Your Kit
If you happen to already have heavy-duty landscaping equipment like a roller or even a Bobcat, then leveling your lawn is a lot easier and quicker. If not, however, the job is perfectly doable with the following kit:
-
- Tiller
- Landscaping rake
- Mower
- Flathead shovel
- 4 Stakes
- Ball of string
- Line-level/carpenter’s level, brick layer’s level, or a string level
- Lawn Roller
- Wheelbarrow or Cart
- Topsoil or Mulch
Step 2: Decide How Much of Your Yard Needs Leveling
At this stage, you can gauge how much of your yard needs to be leveled by visually determining whether the bumps and lumps are confined to one area or are prevalent throughout the lawn or yard. Doing so will save you digging up the whole lawn unnecessarily or, alternatively, digging up just one section only to later discover it would have been better to de-turf the lot.
So, how’s it done?
Simple:
First, give your lawn a quick trim with your mower. Next, walk around your lawn looking and feeling with your feet for grooves and bumps or ridges. As you go, mentally dissect your yard into quarters and assess which quarters need to be leveled.
Step 3: Tear Up the Old Turf
For depressions or sections of your lawn that are only one inch or less lower than the rest of the soil, you can save yourself the trouble of a full-blown re-turf by using topsoil to level out the low spots and reducing bumps with a shovel.
After adding the topsoil, use the reverse of a landscaping rake and/or a lawn roller to level off the new soil and compact the soil further by watering, adding more soil if need be.
If however, the grooves and depressions are deeper than one inch, or if the slope on your lawn drops from one end to the other, then the easiest way to level things up is to start from scratch by removing the old turf.
This can be done as follows:
- Use a flathead shovel to remove the turf in the desired area by cutting squares roughly two feet on all sides and 2/2.5 inches deep and then sliding the shovel under the cut square to extract it
- If you find the turf is coming up easily, you can make larger squares to save time
- When cutting under the square, try to do so at a uniform height to keep the soil as level as possible
If you have de-turfed just a section of your lawn:
- Add topsoil in the de-turfed area, making sure the new soil or dressing is at more or less equal height to the surrounding terrain
- Flatten the topsoil with your rake or shovel, add lawn seed if desired, and water the area to compact the soil/dressing
Step 4: Redistribute Soil With Your Shovel
When dealing with a larger area of lawn, you’ll probably have to flatten the bumpy lawn and fill in depressions in order to make things as level as possible before the next step.
This can be done by simply transferring the dirt you remove from the raised area to the depressions and low points, removing rocks and clods of dirt as you go.
Step 5: Till the Ground to Soften It Up
Making the soil more manageable and malleable before you get down to the next step in the leveling process will save you a lot of time and effort, particularly if working on a larger section of the lawn.
This is done by using a tiller, which will essentially break up the top 3/4 inches of soil, leaving it loose and easier to work with.
If you are looking to raise the height or level of your lawn with topsoil, add one or two inches of topsoil to the tilled ground and pass over the ground once more with the tiller. Spread 2-inches of topsoil and till it into the first 2-inches of subsoil. This reduces the potential for future drainage issues between the two layers of soil.
If you don’t have a tiller and have time and energy to spare, you could feasibly take the shovel-jump approach demonstrated in the video below in smaller lawns:
Step 6: Stake Out the Area You Wish to Level
Remember those four stakes mentioned back in Step 1? Now’s the time to get them out!
- Start by sharpening the points on one side
- Drive them into the four corners around the area of land you want to level
- Tie your string around the tops to create a square or rectangle
- Fix your line level to the string and measure every 3-5 feet to determine which areas require raising and which require lowering: if the bubble in the spirit level is between the two lines, then you’re good to go; if not, get your shovel out and redistribute the soil accordingly
Step 7: Flatten the Soil
Using the back of your landscaping rake, flatten the soil, taking care to check your level from time to time to ensure you are nearing a flat finish.
To simplify this task, it may well be worth making yourself a DIY lawn drag like the one featured in the video below:
Step 8: Lay Sod or Start From Seed
Finally, finish off the job by laying fresh sod or seeding the soil for regrowth. In both cases, be sure to water the treated area regularly in the subsequent days.
Deciding which of the two methods is best for you will depend on a few factors.
First up, if you are in a hurry to get the job done, then sod is the way to go. As demonstrated in the video below, laying your sod can be done in a matter of minutes, giving your lawn a brand-spanking-new appearance with the minimum of effort.
Secondly, if you’re working on a budget or simply don’t fancy shelling out hundreds of dollars for sod, then seeding the leveled area is the way to go. The downside to this method, however, is that it may take several weeks before the new grass is fully through and, depending on the temps in your area, you may be limited to planting or seeding in late spring, summer, and early fall.
Finally, when buying your sod be sure to check that you’re getting sod that’s a good match for the soil in your yard. This can be done by taking a sample into your local garden center or store and having them send a soil sample to a lab for analysis. When the results come back, you can then choose the sod best suited to your lawn’s existing soil type.
To see how to lay sod in your yard, check out this video from Odell Complete:
Aftercare for Your Newly Leveled Yard
Once you’ve achieved the flat backyard of your dreams, you’ll still need to do aftercare to maintain the desired look. In this section of the article, we’ll be walking you through step-by-step how to keep your lawn healthy and grass looking great.
1. Water the Grass Deeply
After your new grass has been established, you’ll want to water it 1 to 1.5 inches weekly during the summer and warmer months. After watering, wait until the soil is dry before watering again, and follow with another session of deep watering. This method of watering your lawn will encourage the grass to grow deep roots, resulting in a better quality lawn that isn’t so easily scuffled.
Especially during the summer and intense heat periods, you’ll want to be sure to water your yard in the very early morning or in the evening when the temperatures are at their coolest. Watering midday will result in excess water evaporation and may contribute to drying out your lawn.
Best Method for Watering
- LARGE AREA WATERING MADE EASY - Our heavy-duty sprinkler on tripod covers your yard with up to a 360-degree rotation, ensuring even water distribution for a healthy and lush lawn.
- LONG-RANGE SPRINKLER PERFORMANCE - With its high-pressure nozzle, our long-distance sprinkler delivers water to every corner of your large yard, effectively reaching even the furthest areas.
- PROFESSIONAL-GRADE IRRIGATION - This impact water sprinkler for lawn is designed for residential homeowners and professional contractors alike, providing precise and efficient yard watering.
- VERSATILITY AND DURABILITY COMBINED - Our yard watering sprinkler features a heavy-duty build and can be adjusted to different settings, accommodating various irrigation needs from small gardens to large yards.
- MEET YOUR WATERING NEEDS - From its long-range capabilities to the 360-degree rotation, this high-pressure sprinkler is a reliable solution for anyone seeking an efficient and effective sprinkler for their lawn.
Last update on 2025-03-28 / Affiliate links / Images from Amazon Product Advertising API
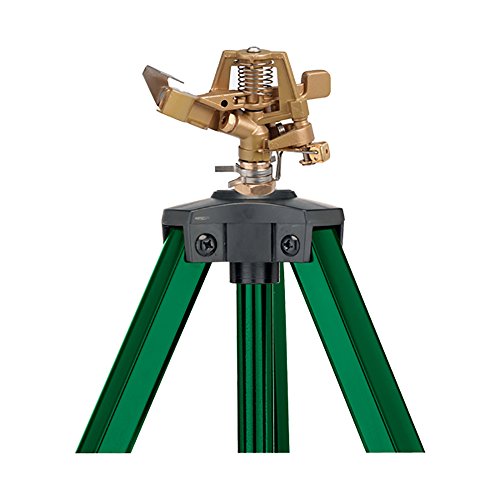
For medium to large lawns, our favorite method of watering is with the Orbit Impact Sprinkler on a convenient tripod. It won’t penetrate your lawn, but rather sits on top of it to protect your grass, and sprays up to 85 feet in diameter (covering up to 5,670 square feet of lawn when set to a full circle pattern). The spray pattern is adjustable to easily water narrow lawns or a single section, or to a 360-degree pattern for optimal coverage. The spray’s distance radius can be adjusted between 20 and 42 feet.
What We Like:
- Impact sprinkler
- Covers nearly 6,000 square feet of lawn
- Made of durable, metal materials for a long-lasting product
- The spray pattern can be adjusted from a partial circle to a full circle for optimal coverage
- Spray distance can be adjusted between 20 and 42 feet
- Affordable
- Won’t penetrate grass thanks to the convenient tripod setup
2. Keep Your Grass on the Taller Side
You obviously don’t want your kids running through a jungle of tall grasses, but keeping your grass at around 3 1/2 to 4 inches tall will help to prevent weed growth, shade the ground to protect the grass from the sun, and aid in water loss prevention.
When mowing your lawn, set it to the highest setting to avoid cutting the lawn too short. After mowing, it’s a good idea to allow the clippings to decay and be absorbed back into the soil. This will give extra nutrients to your newly established lawn.
Best Lawnmower for Tall Grass
- Electric lawn mower with a powerful 11-Amp motor to cut all types of grasses; High efficiency, yet low-maintenance motor for gas-like cutting power.Motor : 120V, AC only, 60Hz, 11 Amps
- Corded electric lawn mower with a large 14" cutting width and 5 changeable cutting height adjustments from 1" to 2.5"
- 2-in-1 rear discharge and mulching system that includes a hard-top 9-gal grass bag with grass level indicator for easy disposal
- Corded lawn mower with adjustable handle height and position for easy and comfortable handling; Compact and slim frame with foldable handles for easy storage and transport
- Lightweight and maneuverable; planet-friendly gas-free lawn mower
Last update on 2025-03-28 / Affiliate links / Images from Amazon Product Advertising API
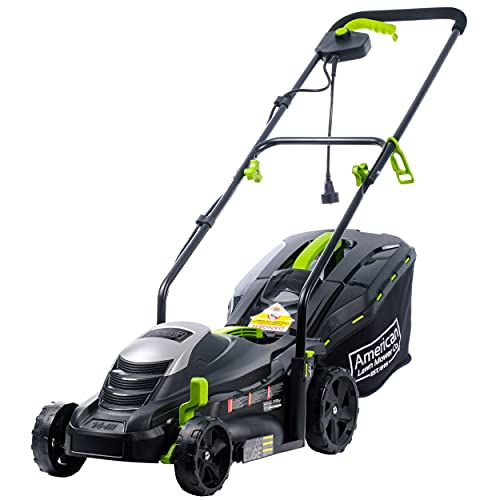
Electric, powerful, and affordable, the American Lawn Mower Company Corded Electric Lawn Mower is a great choice for all grass types and heights. It has a large 14-inch cutting width, 5 height positions, and a rear discharge and mulching system to add more nutrients back into the soil.
The handle also has multiple height positions to accommodate users of all statures, along with comfort-grip material. Because this mower is an electric option, it can’t be sued as freely as its gas counterparts, making this option ideal for small to medium-sized yards. However, it is a cleaner alternative to a gas mower, lighter weight, and easier to store due to its slender frame.
What We Like:
- Affordable, especially for a lawnmower
- Electric
- Wide 14-inch cutting width
- 5 height positions
- Great for all grass types
- Rear discharge and mulching system
- Lightweight and easy to store
3. Choose a Decent Fertilizer and Fertilize Your Grass
Finding and using a good fertilizer is key to having a lush, green lawn; but overfertilizing can lead to rapid overgrowth and grass burns from the chemicals. Therefore, it’s best to only fertilize your lawn once or twice each year.
When you fertilize your lawn, be sure that you have or rent a fertilizer spreader. Rotary fertilizer spreaders will throw fertilizer in a more even fashion. Ensure that you cover the entire yard evenly with fertilizer as to not have different growth rates or patchy coloring.
Best Fertilizer for Lush Lawns

- Scotts Green Max Lawn Food is a dual-action fertilizer and iron formula that feeds your lawn and provides deep greening in just 3 days
- This lawn care product contains 5% iron, a micronutrient that enhances the greening process for fast results
- Apply this fertilizer plus iron supplement to any grass type in the spring, summer, or fall
- Guaranteed not to stain concrete, driveways, or other surfaces surrounding your lawn (when used as directed)
- One 33.33 lb. bag of Scotts Green Max Lawn Food covers 10,000 sq. ft.
Last update on 2025-03-28 / Affiliate links / Images from Amazon Product Advertising API
Our favorite lawn fertilizer is Scotts Green Max Lawn Food. It has thousands of positive reviews, can cover up to 10,000 square feet of lawn, is great for year-round use, and contains essential nutrients for greener grass, including iron.
What We Like:
- Contains key nutrients to encourage a greener lawn
- Begins greening the lawn 3 days after application
- Affordable
- Covers up to 10,000 square feet of lawn, making it perfect for medium to large backyards
- Unlike other fertilizers on the market, this fertilizer can be used in any season with excellent results
- Thousands of positive user reviews
4. Aerate the Grass
Lawns should be aerated every spring or fall to prevent soil compaction and keep your grass healthy. You’ll want to wait to aerate your lawn after a rainy day or after a day of watering so that the soil is moist (but not wet). This will make the entire process go by much smoother. Aerating hard or dry soil is not only difficult but won’t give you the best overall results, either.
To aerate your lawn, you can either hire a professional to do the job for you or take care of the task yourself by following this in-depth aeration guide.
Best Aerator Tool to Do it Yourself

- LAWN DETHATCHER: The Yard Butler Lawn Coring Aerator revitalizes old lawns while using less water and fertilizer. By removing two 3-1/2 inch cores, the Lawn Coring Aerator reduces compaction and dethatches your lawn while letting air, water and fertilizer get down to the roots of your yard.
- DURABLE: The Yard Butler lawn aerator tool was built to last with durable steel construction. The powder-coated steel is heavy-duty and rust-resistant. Cushioned handles provide additional grip. Yard Butler Pro Tools are designed to last a lifetime.
- PRODUCE STRONG & HEALTHY ROOT SYSTEM: It is a high-performance tool that will make a big difference in the vital health and survival of grass. It promotes vigorous root growth, reduces water runoff, strengthens tolerance to drought and heat stress, and helps avoid using excess grass supplements or fertilizers.
- EASY TO USE: Our 37-inch yard aerator lets you tend to your lawn without back strain. The foot bar provides extra leverage for quick and comfortable push so you can aerate your whole yard efficiently and easily. This type of lawn aerator works best when you pre soak the lawn before using it if you have hard, dry soil.
- LIFETIME GUARANTEE: Stop buying plastic or cheap metal products that don't hold up over the years. Yard Butler products are designed to last a lifetime and if you have a problem with our tools we make it right.
Last update on 2025-03-28 / Affiliate links / Images from Amazon Product Advertising API
If you choose to aerate your lawn, yourself, you’ll need an aerating tool. We suggest the Yard Butler Lawn Coring Aerator. It comes in a coring aerator or a spike aerator. Coring aerators take 2 to 3-inch cores of grass and dirt from your lawn in order to aerate. In contrast, a spike aerator creates smaller holes in the lawn as a method of aeration that isn’t so visible or invasive.
Both of the Yard Butler aerators are built to last and made of solid construction. It’s a manual device, meaning you’ll have to physically push and lift the aerator to collect and remove parts of the lawn. They’re also highly affordable.
What We Like:
- Comes in two styles: a coring aerator and a spike aerator
- Affordable
- Effectively cores or penetrates lawn to prevent water build-up, soil compactness, and disease
- Made of solid, long-lasting metal materials
- Coring aerator takes professionally recommended 2 to 3-inch soil cores for proper aeration
Conclusion
Leveling your yard all on your lonesome may well seem like a daunting task, but the benefits of learning how to level your yard and then taking on the challenge — better drainage, increased manageability, overall better appearance, lots of saved $ — far outweigh the hardship entailed in the job’s requisite dirty work and manual effort.
And once your friends see what a good job you’ve made, moreover, you’re sure to get plenty of invitations to lend a hand with leveling theirs!