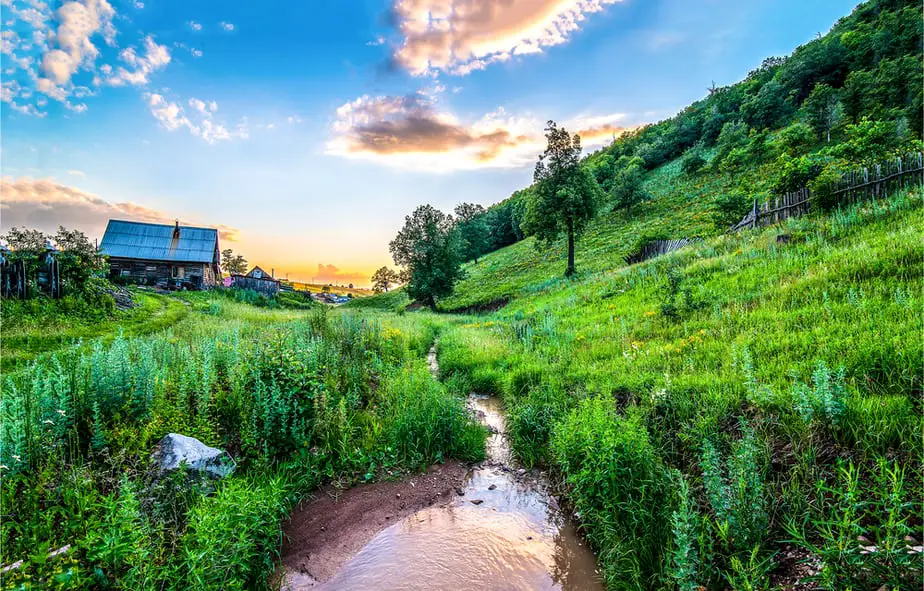
Learning how to make a creek in your backyard is an excellent way to deal with a steep slope that is causing soil erosion. It can prevent further damage to your yard—or your neighbor’s. You can control where the water goes. You can also make it an attractive water feature.
Now that is making lemonade out of lemons.
All it takes is some planning, a trip to your local home improvement store, and elbow grease to make it happen. The benefits extend beyond aesthetics too. It can provide valuable habitat for amphibians like frogs and songbirds. You’ll also enjoy the relaxing sounds of the water trickling down its path.
Our guide will help you every step of the way.
Table of Contents
Step 1: Find Your Site
This one is the most critical part of the process. It will determine how much pleasure you get from it as well as the inevitable maintenance that will follow. We suggest putting it in a place where you can enjoy it the most if the geography works.
If there is a trouble spot where runoff is eroding the soil, that’s an excellent site to mitigate the damage. Selecting a highly visible place will make it a focal point in your landscaping. Easy access is a vital consideration since you will need to do some maintenance. You’ll also need electricity to run a pump to keep the water flowing.
Step 2: Design the Creek’s Path
The basic design includes an upper and lower basin with a pathway through which the water will flow. Adding some curves along the way will give it a natural look and help control the speed.
It’s essential to map out the creek before you start digging or buying supplies. We suggest using spray paint to draw it out to get the numbers you’ll need for your budget and shopping trip. The next thing you must do is to call 811 to locate any underground utility lines.
Even if you’re only going down less than a foot, it’s still a necessary task. You can save yourself some hassle if you look for the obvious paths for utility lines from nearby telephone poles. Of course, you don’t want to be anywhere near meters outside of your house.
We recommend also contacting your city hall in case you need a building permit. Some municipalities may have specific regulations regarding fencing too. The same advice applies to HOAs.
You don’t need a steep slope to get the water flowing. About 10–12 inches per 10 feet of stream will suffice. The next task will help you put the cost in perspective.
Step 3: Figure Out Your Budget
There are two things to keep in mind with this question: the cost of the supplies and the amount of work. The longer and more elaborate the creek, the more of each of these things. To help you get a handle on them, these are the supplies you’ll need to get:
- Underlayment
- EPDM liner
- Boulders about 0.75 tons per 10 feet of stream
- Gravel about 0.5 tons per 10 feet of stream
- Water foam sealant
- Pump
- Decorative stones
- Plants
- Other ornamental additions like driftwood
Supplies to Buy
The underlayment is a material that acts as a barrier between the ground and the liner to protect it from tears and punctures. Be sure to get a product designed specifically for water features.
An EPDM or ethylene propylene diene monomer liner offers several advantages over other products. It is flexible and can handle temperature extremes well. It’s also easier to work with than other materials such as reinforced polyethylene (RPE).
The tonnage of boulders you get depends on the size. Don’t forget the weight factor. Someone has to move those big rocks. We strongly urge you not to skimp on the amount of gravel you get. Besides filling in the gaps along with the sealant, it will also provide a substrate for filtering the water in your pond and reducing your maintenance.
The size pump you get depends on the amount of water that will flow in your creek. The key spec is gallons per hour (GPH). You’ll need the measurement of its widest point to gauge what you should get. Then, consider how loud you want it.
For example, if your creek is 10 inches, then go with a product that delivers up to 150 GPH per inch for a lazy, meandering stream. You can even ramp it up to 500 GPH for a lively brook, especially if the slope is steep.
The other design elements are up to you. We’d suggest items that fit with the area and its surroundings. For plants, you’ll find many water-loving varieties such as pickerel and irises.
We recommend selecting native plant species over exotic ones. For one, they are adapted to the conditions of your area. That means they’re more likely to thrive. But the best part is that many are low maintenance.

- PROTECT YOUR LINER: The underlay protects the pond liner from being punctured by rocks or other debris, as well as damage from rodents.
- POLYPROPYLENE MATERIAL: Sturdy yet flexible cloth is easy to place within your pond area. Adds an additional layer of support for your outdoor water feature.
- SIZE: This 6'x12' precut piece is easy to place for any small pond. Covers up to 72 sq ft
Last update on 2025-03-28 / Affiliate links / Images from Amazon Product Advertising API
Step 4: Gather Your Supplies
Once you’re given the green light, the fun begins! If possible, have the boulders and gravel delivered close as reasonable to the creek site. It’ll save your back. In addition to the other supplies we listed, you’ll also need the following:
- Wheelbarrow
- Shovel
- Utility knife
- Tape measure
- Work gloves
- 5-gallon bucket
- Garden hose
You may find it helpful to rent a sod cutter from your local hardware store if you’re going to make a longer stream with more area to clear.
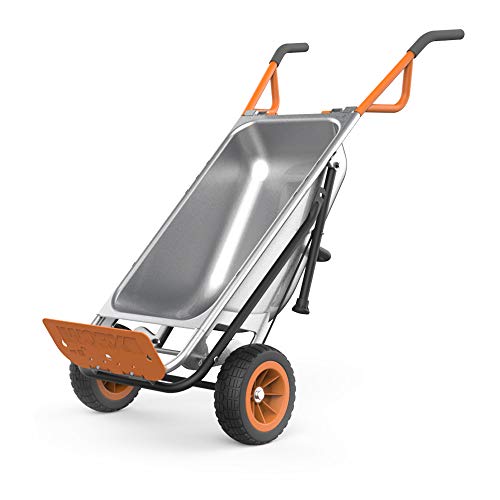
- LIFT 200 LBS. LIKE LIFTING 17 LBS.: Move mountains with ease. Engineered for balance, the Aerocart's Turbo Lift design makes transporting heavy loads a breeze, making 200 lbs. feel like a fraction of its weight. Load up and lean back – it's that simple.
- HANDLE HEAVY-DUTY LOADS UP TO 300 LBS.: With the Aerocart, handle heavy-duty yard projects effortlessly. Move up to 300 lbs. with ease, feeling empowered as you navigate the yard.
- INDEPENDENCE IN EVERY TASK: The Aerocart garden cart turns daunting two or three-person tasks into solo adventures. Whether it's as an 8-in-1 wheelbarrow, hand cart, or a dolly that lifts up to 200 lbs., you're in control.
- 8-IN-1 VERSATILITY: Adapt to any task effortlessly. From heavy-duty wheelbarrow to yard cart, bag holder to dolly, the Aerocart is the ultimate multi-functional tool with various options of accessories included.
- SMART 2-WHEEL DESIGN: The Aerocart's innovative design guarantees optimal balance. Its clever two-wheel placement with dual support legs makes loading and leaning effortless, also ensuring smooth and safe steering.
Last update on 2025-03-28 / Affiliate links / Images from Amazon Product Advertising API
Step 5: Start Digging and Install the Pump
Double-check your design and grab a shovel. Start with the lower basin first and work your way up to the top of the creek’s path. Make sure to add a few shelves along the way for aesthetics and places to put plants.
Follow the instructions with your pump to install it properly. It must remain submerged. You’ll likely have to dig a deeper hole for it. Keep track of the power cord so that it doesn’t get buried accidentally.
Step 6: Lay Down the Underlayment and Liner
Put down the underlayment directly on top of the ground. Remove any rocks or other debris as you go. Then, follow the same procedure with the liner. Use some rocks to hold it in place. Be sure to leave some slack to make up for the weight of the boulders and gravel to avoid overstretching it.
We suggest leaving an overhang all along the edges. It will provide an excellent barrier against weeds.
Step 7: Add the Boulders and Seal Them in Place
Begin placing the boulders in and around the creek. Use flatter ones on the shelves to act as a spillway. Step back every now and then as you go to see how it looks from a distance. Move them around to get the look you want. Conceal the pump but do not interfere with the water flow.
Be creative!
Once you’re satisfied with it, start cementing them in place with the water foam sealant. Fill any gaps you find between the rocks.
Step 8: Just Add Gravel
We’re getting close to the finish line with the addition of gravel. Distribute it down the entire length. Also, place some within the boulders to create a natural look. Plan on at least a 3-inch layer to give an adequate base for plants.
Step 9: Place the Decorative Items
This one is one of the most enjoyable tasks when learning how to make a creek in your backyard. Call on your inner artist to add things such as driftwood, decorate stones, or other items to complete your vision. A well-placed submersible light will make it a focal point at night too.

- 48-LED COLOR CHANGING SPOTLIGHT: It comes with total 48 LED changing color lights for this submersible lamp and with these colorful underwater lights, it will render your garden look a bit more alive and thereby, creating a kind of warmth, together with harmonious and romantic atmosphere in your backyard.
- HIGHEST WATERPROOF GRADE: It is obvious that this pond light is absolutely waterproof and the waterproof grade standard can reach up to IP68,namely, the highest standard of water-resistance. Meanwhile, it indicates that the lamp body can be entirely submerged in water without causing any problem.
- DRIVE-BY-WIRE MODE: All of the switches of pond lights are controlled by an electric wire. Compared with other remote controls on the market, this drive-by-wire type is tended to be more stable and it will not easily damage. It can not only set multiple lighting modes but also set the timing function.
- TOUGH, DURABLE & ENVIRONMENTALLY-FRIENDLY: The submersible LED lamp is made out of ABS engineering plastics and thus, proving that it is tough, sturdy and recyclable enough to make it suitable to be used for a long-term period. As a result, it definitely ensures the safety of illumination under water.
- VERSATILE-USE &100% CUSTOMER SATISFACTION: There is a wide application of this submersible spotlight and with its waterproof peculiarity, it can be widely used in aquarium, fountain, swimming pool, pond and fish tank etc. It comes with one-year warranty guarantee and friendly customer service.
Last update on 2025-03-28 / Affiliate links / Images from Amazon Product Advertising API
Step 10: Landscape Around the Creek
If you’re adding plants outside or beside the creek, now is an excellent time to get them in the ground. Varieties such as dogwood and horsetail are attractive additions that will add interest to the water features and provide habitat for wildlife.
Step 11: Fill it Up and Start the Pump
Fill the creek using the garden hose gently. Once the pump is covered, start it up and observe the water flow. Make any adjustments as necessary by adding more rocks if it’s moving too fast and disturbing the gravel.
Step 12: Place Any Pond Plants in the Creek
They say that plants and pictures make the home. Plants certainly add pizazz to a backyard creek. We suggest that you begin by rinsing the roots of each one and gently teasing them apart. Then, place in the stream, using gravel or rocks to anchor them in place, giving them room to grow.
Be sure to plant them when the temperatures are warm enough. Some prefer warmer, summer temps. That’s another reason why it’s wise to stick with native plants. Follow the requirements for spacing just as you would for your garden.
The next thing you must do now is to pull out the lounge chairs and enjoy the view — and sounds!
Final Thoughts
Learning how to make a creek in your backyard isn’t difficult. Sure, the shoveling is tough, and you probably felt it the next day. But the satisfaction of taking a load of rocks and gravel and making it something beautiful is a feeling to relish. You’ve given yourself another reason to enjoy your yard.