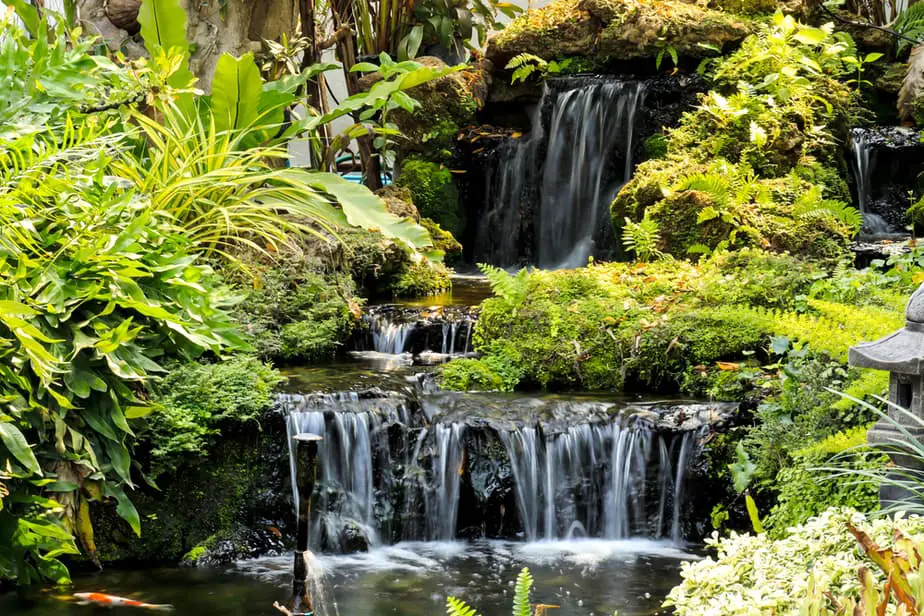
We all have a natural affinity for water. We can’t help ourselves. The sound of water trickling down a stream or over a falls is soothing. Luckily, bringing this feature to your landscaping plan isn’t as difficult as it sounds, once you know how to install a waterfall in your backyard.
It’s no wonder that adding a water feature is such a popular design element, according to the American Society of Landscape Architects. It’s an excellent way to connect with nature and enjoy the health benefits that it offers for both you and the environment.
Our guide will walk you through the entire process from siting the project through the selection of materials. We’ll provide tips along the way to make the task easier so that you can get the most out of your efforts.
Table of Contents
Step 1: Begin with a Design
The first step for how to install a waterfall in your backyard is to decide on a plan. You can make this feature with or without a pond at the end. If you choose to add one, you can either get a preformed product or create your own using a liner.
The advantage of a preformed pond is that it eliminates the guesswork. You can get one that is a manageable size to keep your costs and labor under control.
The liner gives you more freedom with the design, whether you want to create a stream with an upper and lower basin or build a pond with the specs that you want. It’s a smart choice if you already have a steep backyard since it can cut down on your digging if you use the natural slope of the land.
Step 2: Choose Your Site and Make Your Plan
There are several things to consider when picking a spot for your waterfall. You should put it someplace that you can see and enjoy it easily. If you’re going to add plants or fish, you’ll want a location that gets at least six hours of sunlight and not under any trees. It also must be accessible. You’re going to have to do regular maintenance on it.
Make it easy for yourself.
No matter which setup you’ve chosen, access to electricity and water is a must-have. You’ll need the former for the pump and filter and the latter to fill it. We’d suggest picking an alternative site, just in case.
Next, get your concept down on paper. You’ll find it helpful to measure out the setup to help you estimate the materials you’ll need.
Before you begin, call your city hall and homeowners’ association. You may find that you’ll need a building permit. Of course, you don’t want to run afoul of any HOA rules, either. You should also call 811 to map out the utility lines from your house. That’s why we suggested a backup plan.
Step 3: Determine Your Budget and Material List
You probably have many of the garden tools you’ll need for this project. They include:
- Shovel
- Wheelbarrow
- Garden hose
- Level
- Tape measure
- Work gloves
You’ll need to buy the following supplies:
- Liner or preformed pond
- Underlayment
- Pump
- Filter
- Water foam sealant
- Tubing
- Ground paint
- Construction adhesive
- Boulders
- Gravel
The size of your setup will play a direct role in the cost of the boulders and gravel. Start by multiplying the length and width of the pond or upper/lower basins. Then, divide by 65. That will give you the number of boulders you need in tons. Divide that figure by 0.45 to determine how much gravel you will need in tons.
Don’t let the numbers scare you. You’ll find that these materials cost a lot less than decorative stones you’d use to make a garden path.
If you’re going to use a liner, we recommend getting 0.45 ml EPDM (ethylene propylene diene monomer) rubber. While heavy, it is durable and can handle outdoor conditions well. Make sure to get a product appropriate for use with a water feature.
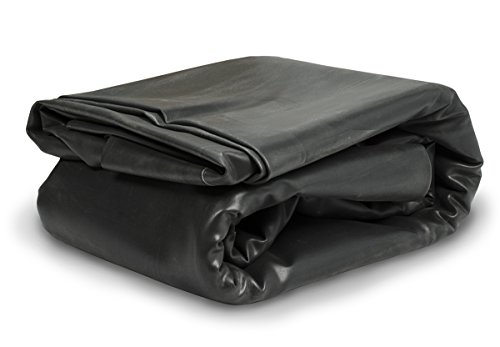
- 45 mil thickness provides superior durability while maintaining the ability to stretch
- Exceptional resistance to solar UV, ozone, and oxidation
- Great for use in ponds, Pondless Waterfalls, and other water features; safe for fish and plants
- Measures 8 x 10 Feet
Last update on 2025-03-28 / Affiliate links / Images from Amazon Product Advertising API
Step 4: Get Your Underlayment
The purpose of the underlayment is to protect the pond or liner. You can use materials suited for this use. You can even use carpeting. Another option is to put down a 3–4-inch layer of sand and tamp it down for a base. The two previous ones are the most convenient. Sand is a wise choice if the site is uneven.
Step 5: Buy Your Pump and Filter
Before you purchase these items, you must decide if you’re going to have plants, fish, or both. That will determine which product you should get.
Pump
There are several different types of pumps, some of which incorporate a filtration system with them. A statuary pump is an excellent choice for smaller setups. They are both affordable and reliable. Another popular option is a submersible pump. Their greatest advantage is that you can conceal them, which is a plus for a natural-looking waterfall.
You’ll also find waterfall pumps specific for this use. They often include extra features for maintaining your setup easily and ensuring decent water flow. The spec you should check is the pump’s discharge rate in gallons per hour (GPH). We suggest at least 300 GPH, depending on the size of the area. A steeper slope and larger basins will require a stronger pump.

- Solid Construction & Overload Protection: The shaft and drive ring piece are made from silicon carbide material, reduce the attrition and increase the service life; It is totally waterproof (IPX8) and provides overload protection
- Energy Saving with Low Noise: Ultra-quiet operation design(30-40db); Less power(100W) consumption with high output(1600GPH/6000LPH) which compared to other pumps; Fits for 264 Gallon Pond
- High Lift with Detachable Filter: Lift height can be up to 15FT/4.57M; This pump can more than accommodate your water features with portable handle and detachable filter
- Easy Installation: Adjustable outlet direction and 20.3FT power cord, to meet different requirements; Flexible Tube Size: 3/4” or 1” internal diameter; It can be worked with filters (filter system) together
- Multiple Usage: VIVOSUN Fixed Flow Rate pump can be used as submersible or inline; Multifunctional design for diving or land use; It is ideal for a variety of applications in ponds, fish tanks, fountains, waterfalls, etc.
Last update on 2025-03-28 / Affiliate links / Images from Amazon Product Advertising API
Filter
Without fish, the filter’s main purpose is to keep debris from getting into the pump. Submersible filters offer an unobtrusive way to get the job done. They’re easy to install and operate with only occasional maintenance. External filters are another option that are more accessible for these tasks. However, many models require the use of a second pump.
If you have a larger setup, you can go with a waterfall kit that includes a surface skimmer and a spillway that returns the water back to the basin. You can easily incorporate both components into your landscaping.
If you’re going to add fish, you’ll need a biological filtration system. It will break down ammonia and other chemicals in the water to keep it safe for them. The type you’d use in this setup is not unlike one you’d see in an aquarium. You’ll need to clean it periodically, making access to it a deciding factor.

- SUBMERSIBLE FILTER: Flat box filter prevents pump from clogging and keeps pond water clear and clean.
- PARTS INCLUDED: Coarse and fine foam pads, tubing and three hose fittings.
- CONVENIENT: Attach to various pump inlets – easy to detach for cleaning.
- WARRANTY: Includes a 1-year limited warranty – see product packaging for details.
- USAGE: Ideal for use with ponds up to 500 gallons.
Last update on 2025-03-28 / Affiliate links / Images from Amazon Product Advertising API
Step 6: Mark Out the Location of the Setup with Ground Paint
Using your plan and a tape measure, delineate the area for your waterfall and basins or pond with ground paint. Double-check how it fits with other parts of your landscaping. Now is the time to make any last-minute adjustments.
Step 7: Start Digging
This step is the most difficult and time-consuming. If you’re using a preformed pond, keep the shape and levels in mind as you dig. Check it against the form as you go to make sure that it fits. If you’re going freestyle, we suggest adding some shelves to create interest and provide additional spots for plants. You can also place them to direct the water flow.
You can use the earth you’re digging up to build the foundation for your waterfall. It’ll also provide you with a good start for raised garden beds

- LARGE PLANTING SPACE: Designed with a long bed space (5CuFt) deep enough to provide your plants and vegetables with ample room to breathe and grow healthy
- PROPER DRAINAGE: Allows excess water to drain out, keeping soil fresh and protecting plants from waterlogging or mineral buildup
- ALL-WOOD CONSTRUCTION: Naturally durable Chinese fir wood provides a water- and weather-resistant structure
- ERGONOMIC HEIGHT: The 30-inch tall design reduces excessive bending and kneeling to help preserve your back and knees as you tend to your balcony, deck, or patio garden
- RAISED GARDEN BED LINER: Separates wood from the soil, keeping the wooden garden planter in excellent condition and discouraging weeds and animals from interfering with plant growth; OVERALL DIMENSIONS: 48"(L) x 24"(W) x 30"(H); WEIGHT CAPACITY: 200 lbs.
Last update on 2025-03-28 / Affiliate links / Images from Amazon Product Advertising API
Step 8: Lay Down the Underlayment and Liner, If Using
It’s essential that the bottom of the hole is level so that your preformed pond won’t crack under pressure. Add soil or sand as necessary and put down the underlayment. Make sure that there aren’t any folds in the material. If using sand, tamp it down to compact it.
Next, lay the liner on top of the underlayment, taking the same care that it is flat against it. Give yourself some slack for adding the boulders. Adjust it as necessary to ensure that it fits properly with some overhang on all sides. Hold it in place with stones.
Step 9: Install the Filter and Pump
Follow the manufacturer’s directions for the proper placement of the filter and pump. If you’re using a kit, make sure that the spillway is tilted downward slightly to ensure that the water will flow unimpeded. Don’t worry about concealing any power cords yet. Plug them in but wait to turn on the devices.
Step 10: Build the Structure, Starting with the Boulders
Now is where the fun begins. You start putting your boulders and stones in place along the edges from the bottom of the slope and working your way up to the top. We’d suggest stopping every and then to see how it looks from a distance. Adding curves to their placement will give your waterfall a natural look. Build up the shelves along the way.
Feel free to move the rocks around to create a pleasing structure.
Step 11: Set it in Stone (Literally)
Once you’re satisfied with the look of your boulders, add gravel to fill in the gaps and bottom of the basin. Push them in place so that the rocks stay in place. Then, spray water foam sealant in any gaps. The purpose of this step is to stabilize the waterfall and prevent soil from outside of it from getting into the water and fouling it.
You can also use construction adhesive on the larger stones for additional support. Keep sprinkling the gravel around to fill holes and hide the sealant. Likewise, pack gravel around the edges and between the boulders.
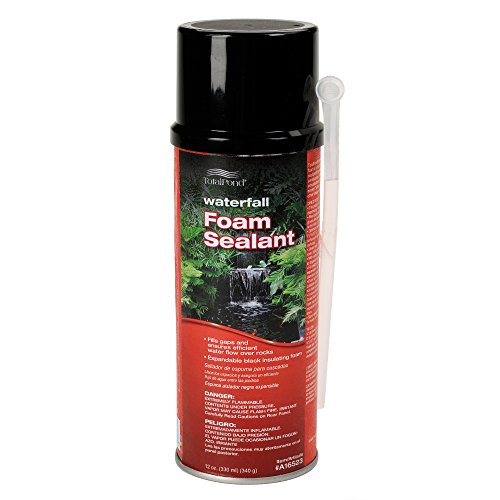
- Waterfall Foam Sealant is a single-component polyurethane black foam that fills gaps and ensures efficient water flow over rocks.
- The foam adheres to most surfaces except: teflon, silicone, polyethylene, and other similar materials.
- Waterfall Foam Sealant takes approximately 5 minutes for the outer shell to dry tack-free; Compound fully cures in 12 to 24 hours.
- The 12 oz. can includes a nozzle tip applicator.
- Before using this product, make sure all surfaces the sealant will be applied to are completely dry; allow the product at least 48 hour to dry before getting it wet.
Last update on 2025-03-28 / Affiliate links / Images from Amazon Product Advertising API
Step 12: Landscape Around the Waterfall
Before filling the basin, now is the time for landscaping around the area and clean up the site. We suggest keeping at least 6 inches of the excess liner around the structure to act as a barrier for weeds. Cover it up to conceal it. Also, hide the cords leaving the site with gravel or other materials. You may find it easier to keep any plants in their pots before digging to see how it all fits together.
Step 13: Fill Your Waterfall
Pull out the garden hose and start filling up the basin. Let the water flow into the space gradually, instead of gushing into it and upsetting the rocks and gravel. Once the pump and filter are submerged, you can turn them on to aerate and clear the water. Step back and observe how the water is cascading over the falls. Adjust the flow as needed with additional stones.
Step 14: Maintain the Waterfall
You will need to clean the filter occasionally to keep everything running smoothly. Leaves and twigs can block the intake and disrupt the flow. These tasks are essential since the pump can overheat without adequate water flow. You should also skim the surface of the basins for any debris.
If algae develop, you can add a commercial product to clean the water. Proper aeration is excellent prevention. If you notice it on the rocks, simply turn them over to cut off their UV supply. The algae will die, revealing the natural colors of the stones.
Final Thoughts
The satisfaction that this water feature will bring is worth the effort of adding it to your landscaping. With some planning and a mind toward costs, you can get the benefits it offers and adds to the appeal of your yard. It all begins with learning how to install a waterfall in your backyard along with the right supplies to make your vision come to life.