A pitching mound in your backyard will help you or the pitcher in your life get daily accurate practice of their pitch. Whether it is for a wiffle ball league, little league pitcher, or just extra practice, we will teach you how to build a pitching mound in your backyard that will improve your pitching game.

Building a pitching mound that will withstand the wear and tear of play and weather takes dedication and time. However, purchasing a mound can be quite expensive! We will provide you with tips and tricks that should get you going in the right direction.
Gather the materials and read on to learn how to make the best pitching mound in your backyard for your practice needs.
Table of Contents
Materials:
- Pitcher’s plate (18 in x 4 in for Little League, 24 in x 6 in for upper divisions)
- Large nail or spike
- Lawn spray paint
- Rope or string
- Square-faced shovel
- Specialty mounding clay or soil composition of 40% clay, 40% sand, and 20% silt
- Tamp or vibrating asphalt compactor
- Mound slope board or slope gauge
- Concrete or pavers for pitcher’s plateau
Dimensions of the Pitching Mound
The dimensions of the pitching mound depend if you are in Little League or upper-level divisions. Note the distances below depending on the level of play for your pitching mound. You will refer back to these throughout the construction of the mound. Always check with your league to verify distances and measurements before constructing your mound!
High school, College, and Professional Baseball
- Distance from the apex of home plate to the front of the pitching rubber: 60 feet 6 inches
- Mound height: 10 inches
- Mound Diameter: 18 feet
Little League
- Distance from the apex of home plate to the front of the pitching rubber: 46 feet
- Mound height: (May vary depending on the league) Under the age 11 years is 6 inches, 11-13 years old is 8 inches
- Mound Diameter: 10 feet
Step 1: Measure Distance, Alignment, And Height
Measure the distance from the apex of home plate to the front of the pitching rubber. Place a stake 18 inches in front of the pitcher’s plate or 59 ft from home plate for a high school level mound. Pitching mounds are typically aligned in a North-east facing direction, but for a practice mound, you can choose what works for your space.
The stake that you placed at 59 ft will serve as a marker for the center of your mound. Note that the pitching plate is NOT placed in the center of the mound. Attached a string to the stake and stretch it tight at the length of half the diameter (5ft for little league, 9 ft for upper-division). Mark the circumference of the circle mound boundary using the rope attached to the stake. If you do not have space for the full diameter of the mound, it is okay to shrink the mound a bit, especially behind the pitching plateau and on the sides.
Scrape and remove any turf from inside the mound. A pitching mound should not have any grass in it.
On the stake in the center of the mound, mark the depth of the mound. This would be 6-10 inches depending on your level of play. This mark will guide you as you make layers in future steps.
Step 2: Lay Layers and Add Sub-Base
Once you have made all your measurements, you will begin to add the clay mix. You will want the soil to be a bit dryer than Play-dough. Moisture will be key to getting your layers to bond and condense correctly. Begin layering the clay mix inside the circle one inch at a time.
Use the tamp to pound the clay vigorously ensuring the soil is quite firm. When this layer is firm, you will move on to the next layer of clay mixture. On each consecutive layer make the one-inch mound of dirt smaller by 3-6 inches in diameter. Continue this process until you reach about half the height you marked on the stake in the center of the mound. Periodically moistening the mound will help pack the soil down and maintain the texture of dry Play-dough.
Step 3: Build Pitcher Plateau
Pitching mounds should not come to a point, but to a plateau that rests the pitching rubber. You will need your little league pitching rubber that is 18 inches by 4 inches or intermediate and higher division plate that is 24 inches by 6 inches.
The rubber should be centered on the home plate. Draw a line down the center of the plate using a pencil. Line up the center with the apex of home plate. The pitcher’s plate should measure a distance of 46 feet for Little League and 60 feet 6 inches for upper divisions.
Always use a pitching rubber that can be secured into the plateau. We recommend a four-way pitching rubber that can be rotated periodically and last several years.
- Little league mounds should have a plateau or level area that is 40 inches by 17 inches. The longer sides of the rectangle should stand 4 inches in front of the pitching rubber and extend 32 inches behind the plate. The shorter sides of the level area should be centered on the pitching plate with 11 inches on both sides.
- The upper league plateau is 5ft by 3ft. The longer sides of the rectangle are 6 inches in front of the rubber and 24 inches behind (assuming the rubber is 6 inches wide). The shorter sides are 18 inches front the sides of the rubber or centered.
Creating a frame using boards will help you keep the proper size level area as you build your plateau. Place your frame on the sub-base and measure the depth of the mound with the frame. Build the sub-base until the top of your frame is at the required depth.
Build up the plateau area as needed by adding more clay composition inside the frame and tamping down. Check that the area is level. Don’t forget to add the pitching rubber as you are adding clay to the plateau. Double-check measurements and use a level as you add the rubber. The pitching rubber should end flush to the plateau.
Remove your wood frame when the plateau is firm. Fill in the holes left by the frame with more mound dirt.
- Molded rubber construction with inner support tubing lasts through tough games and practices
- Delivers a solid foundation to give pitchers firm footing when throwing
- Designed to be periodically rotated for use over multiple seasons
- Comes complete with inner support tubing & Designed to be rotated periodically for extended life
- Brand: MacGregor
Last update on 2025-03-28 / Affiliate links / Images from Amazon Product Advertising API
Step 4: Add Slope
Use a slope gauge or other tool to measure the height of the mound. The mound should slope about 1 inch per foot from the edge of the pitching plateau in each direction. Smooth out any areas as needed and vigorously tamp the mound until it is quite firm. Carefully attention to the slope will help to prevent injuries as the pitcher leaves and returns to the pitching plateau.
Step 5: Mound Maintenance
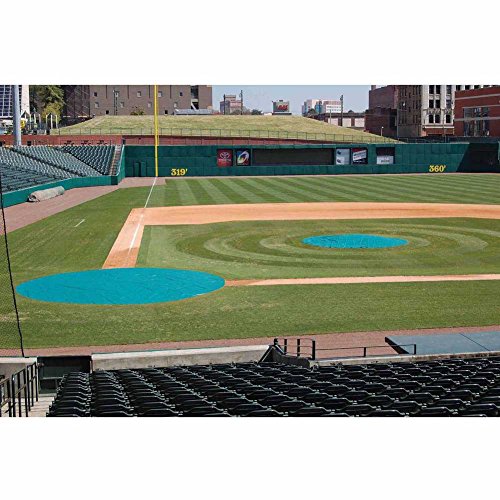
Now that you have put all this work into your mound, protect it by keeping it well maintained. Your mound will naturally get holes and worn spots where the pitcher pushes off with their foot and lands when completing a pitch. Sweep these holes clear of debris, moisten the area, and add new clay to the worn areas as needed. When the mound is not in use, always cover it with a tarp or pitcher’s mound cover to prevent erosion, foot traffic, and maintain moisture level.
Last update on 2025-03-28 / Affiliate links / Images from Amazon Product Advertising API
Step 6: Add Equipment
Now that you have learned how to build a pitching mound in your backyard, add the right equipment to get the most out of your practice.
- A bucket of baseballs will ensure your time is spent pitching instead of retrieving balls.
- A bag of rosin will keep your grip dry and ready for curve balls!
- Don’t forget a net to stop your speeding pitches!
- A speed gun will help you see the improvement that daily practice brings!
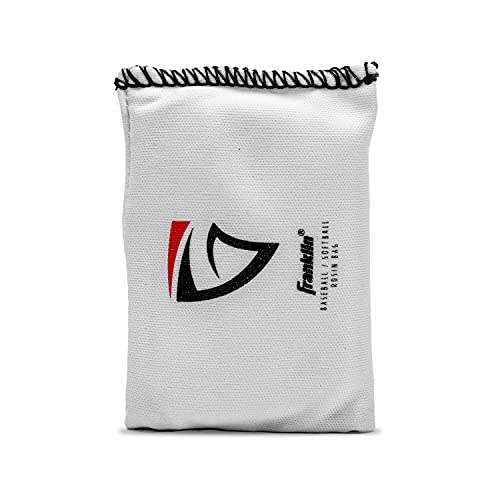
- ABSORBS MOISTURE: Unique gator grip formulation engineered to optimize moisture absorption and keep hands dry on the mound
- NON-TOXIC ROSIN: Ideal for Baseball and Softball players providing the necessary grip to thrown an accurate pitch
- GRIP ENHANCER: Designed to help grip the bat or ball during practice or competition
- LONG LASTING: Ultra-durable, sturdy bag is engineered to perform and last over extended periods of time
- GREAT SIZE: Packaged in durable, thick cloth bag and measures 3.5" H by 2.4" W
Last update on 2025-03-28 / Affiliate links / Images from Amazon Product Advertising API

- Heavy duty & proven durability: 2X double thick netting, heavy & sturdy frame. Increased thickness adds rigidity and weight for greater stability when batting into the net.
- Stop chasing balls around the yard: Our unique fold-up design makes the net easy to set up so you can start practicing within minutes, and waste less time chasing balls.
- Perfect for batting and pitching skill development: Our super strong 7-ply knotless netting and increased frame thickness adds rigidity and weight for greater stability when batting and pitching into the net.
- Folds down and easy to transport: The sturdy and stable yet lightweight net and frame collapse into the included carrying bag for easy transport and storage.
- Rukket Fair Play Guarantee & Lifetime Warranty: At Rukket Sports we know you came to win. We also understand that in order to win you need to train hard, so that’s why we’re proud to offer the Rukket Fair Play Guarantee & Lifetime Warranty and outstanding USA-based customer service!
Last update on 2025-03-28 / Affiliate links / Images from Amazon Product Advertising API
Conclusion
Whether you have a little leaguer or major baseball player, a pitching mound in your backyard will help you to get the daily practice a good pitcher needs. Instead of purchasing an expensive mound, we have provided tips and tricks on how to build a pitching mound in your backyard for much cheaper!
Using a clay soil composition, a few tools, and dedicated labor you will achieve a professional quality mound in the comfort of your own backyard! Stroll outside, wind up your arm, and PLAY BALL!