While it may not sound like a common DIY project, learning how to build a backyard bunker has some practical uses. You can use it as an emergency shelter in case of a tornado or other extreme weather. Some people install them as a cellar for storing food and supplies. Either way, the process is similar.
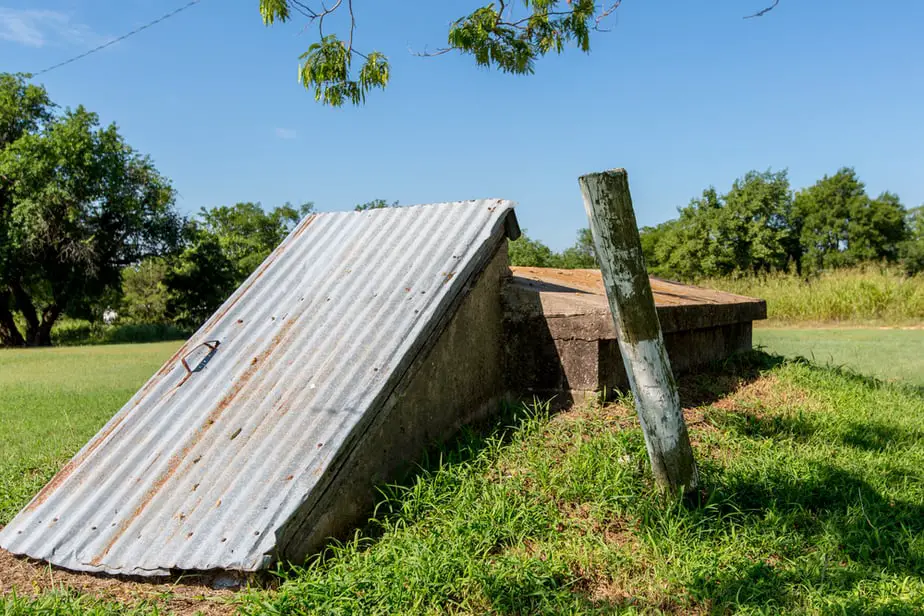
The general layout involves a lot of planning and the use of heavy equipment like a Bobcat to excavate the site. As you may surmise, it isn’t cheap, either. However, when done properly, you have the peace of mind of having a shelter or cellar that can last a lifetime.
Table of Contents
Step 1: Contact Your City About the Necessary Permits
Undoubtedly, you’ll need approval before building the bunker, especially if it affects the water flow. You might also need to get permission from the county or state Department of Natural Resources. It’s wise to start this process early in the game since it’ll have a direct impact on other aspects of your project.
Step 2: Choose a Site
The ideal scenario is that you’ll have a hillside into which you can dig the bunker. That can cut your costs and provide a path for drainage down a slope. If that isn’t possible, you’ll likely need to install a french drain system to prevent water from seeping into the structure. It isn’t an expensive addition, but it is something for which you must have a plan.
Once you’ve decided on a site, you must call 811 to have utility lines marked before you start digging. Most are located relatively close to the surface. We suggest having an alternative place in mind, just in case. Ideally, it is well-drained and at least 10 feet from any existing structures.
- Tough enough for the toughest contractor, these tapes feature superior blade extension
- This item belongs to tape-measures
- Item is manufactured in China
- The ideal tape measure for anyone using a metric measuring scale
- Ergonomically designed chrome case
Last update on 2025-03-28 / Affiliate links / Images from Amazon Product Advertising API
Step 3: Make a Plan
Fortunately, you don’t need a huge space if you’re going to use your bunker as a root cellar. A 5-foot-by-8-foot room is more than adequate to store plenty of items. You’ll need a larger area if you plan to use it as a storm shelter.
Keep in mind that you’ll need to reinforce the structure with cinder blocks or concrete walls, so plan on some extra space all around. The design must account for the following:
- Air circulation to prevent mold and allow ethylene gas to escape to prevent spoilage
- Access to electricity to power a fan
- Suitable depth to maintain stable temperatures under 40 degrees Fahrenheit for food safety
- Enough drainage whether it’s in the construction of the floor or other system
The basic structure of a bunker includes above-ground access and vent pipes to maintain adequate airflow. It will also need a reinforced roof to maintain the inside environment and prevent it from collapsing.
Step 4: Dig the Hole
Renting a backhoe from your local equipment rental store will make this step much easier. Your cost will likely include delivery. However, you’re responsible for diesel fuel to run it and clean-up after the use to avoid extra fees. We strongly urge you to review the contract carefully to avoid any nasty surprises. The object is to create a space with straight walls.
Step 5: Put in Footers
Your bunker will need concrete footers to hold up the walls at all corners. They need to be below the frost line to prevent shifting and to keep it stable. The depth will vary, depending on where you live. An auger will make short work of it. Allow enough time for the materials to set before proceeding to the next task.
Step 6: Build the Walls
Using cinder blocks is a perfect way to shore up the bunker. They are inexpensive. You’ll find them easy to move around and place. They offer a solid reinforcement. Once placed, you can fill them with concrete for even better insulation. The advantage of going this route is that you can maintain the optimal temperature despite the conditions above ground.
Step 7: Leave Room for Ventilation
Adequate ventilation is a must-have. Fortunately, it’s easy to do. You can put in an opening near the bottom and another at the top level to keep the air moving. You can also install a fan to ensure it’s enough. The trick is balancing air movement with temperature. One way that you’ll often see is bunkers covered over with sod with a metal flue sticking out.
We’d suggest tilting any exposed PVC or pipes to keep snow and rain out of the interior. Also, you should put screens over the tops to keep rodents from devouring your stash of stored goods.
- For masonry chimneys only. Not for use with air-cooled metal chimney systems. Fits outside tile (inches): 11.5 to 12.5 Round.
- 24 gauge 100% stainless Steel hood with scalloped corners and roll-formed edges, 18 gauge 3/4 inch 100% stainless Steel expanded metal mesh.
- Slotted hex-head stainless Steel mounting bolts for easy, durable installation. Outside mounting provides greater free air space.
- Expanded metal mesh turned inward at base allows cover to rest firmly on flue tile, closing any openings to protect against nuisance wildlife.
- Lifetime limited warranty.
Last update on 2025-03-28 / Affiliate links / Images from Amazon Product Advertising API
Step 8: Add a Floor
How you tackle this task depends on where you live and the lay of the land. The key is drainage. A bare earth floor is suitable if seepage isn’t an issue. Otherwise, you’ll need to move water from the site with a way to divert it away from your bunker. If the soil has a lot of sand, you can add a 1-foot gravel base. The soil along with this material will ensure that nothing pools inside of the structure.
Again, balance is vital. You must maintain a high humidity of over 85 percent within the bunker. However, the temperature needs to be low enough so as not to encourage mold. A smart idea is to keep track of it with a hygrometer. You may even find that you’ll need to sprinkle the floor with water occasionally.
Step 9: Install a Door
A steel door will secure your bunker and also add a layer of protection against pests like rodents or raccoons. You can add a lock or motion-sensor security light to keep it safe from interlopers of the two-legged variety.
However, if it is a storm shelter, you should make it easy to enter since you may not have a lot of time to find shelter inside of it.
Step 10: Add a Roof
A concrete roof reinforced with rebar is an excellent way to keep it from collapsing while providing the necessary insulation layer. You can use a pre-formed piece in which to pour concrete. We’d suggest making it with sloped sides to allow snow to slide off of it more easily to reduce any added pressure on it. It will also provide the base for the next task for learning how to build a backyard bunker.
- HEAVY DUTY STEEL REBAR J HOOKS- Chisel pointed ends, for hard clay or rocky soils
- STAKE MEASUREMENTS-12 inches long top to bottom Inside of hook is 1-1/2 inch 3/8 inch diameter
- Bare Metal-Not Galvanized Will rust Our tumbling process may leave a black residue you can wiped off
- Set of 32 Steel Rebar J Hook Ground Anchor Stakes
- Made in the USA
Last update on 2025-03-28 / Affiliate links / Images from Amazon Product Advertising API
Step 11: Sod the Roof
Let’s face it. As useful as a backyard bunker is, it’s not the most attractive thing you can add to your landscaping. Sodding can take out the sting by making it look a bit more natural. Sodding is a better choice than soil and seed since you’ll get an immediate fix. It also adds another layer of insulation for maintaining constant temperatures that are vital to a safe storage environment.
Step 12: Stock Your Bunker
Regardless of the drainage situation, we’d suggest putting a base layer on the floor, such as pallets or more cinder blocks. If you’re storing foodstuffs, it’ll increase circulation around them, which can help things stay fresh. It is also an excellent safeguard for that unexpected flooding event.
It behooves you to make efficient use of your space, too. Ready access is essential. Readable labeling with expiration dates is crucial to get the value out of storing food. What you put inside of it also depends on its purpose. The things you’d put in a storm shelter will vary from a root cellar. Keep that in mind if you want it to do double-duty.
Last update on 2025-03-28 / Affiliate links / Images from Amazon Product Advertising API
Final Thoughts
When you research how to build a backyard bunker, the first things you’ll encounter will likely go into the survivalist realm. However, these structures can store your fresh produce or canned goods. They can provide a safe place for you and your family if extreme weather events strike. While the project is involved, it’s also rewarding to provide something valuable for your loved ones whatever its use.