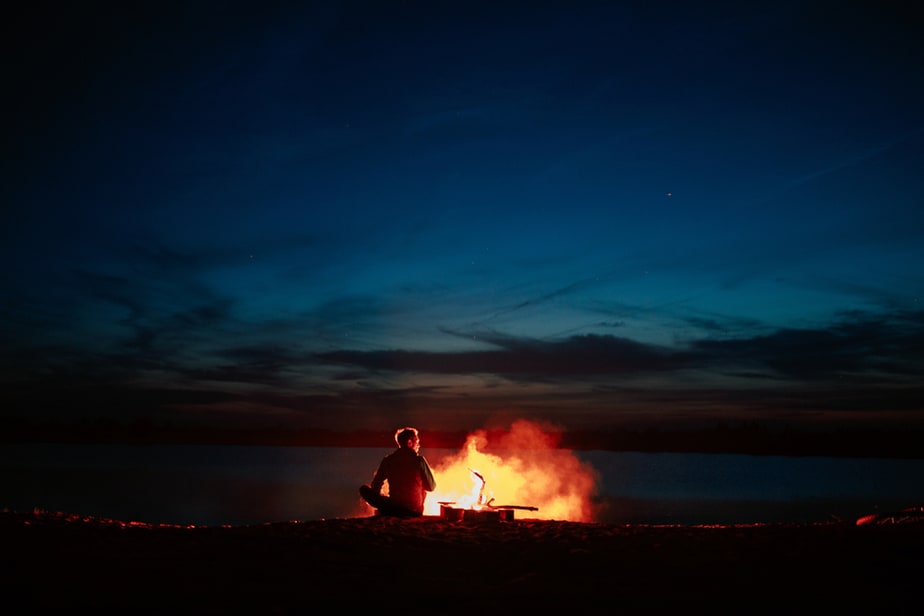
Nothing says summer like a fire with everyone gathered around it, enjoying the evening. Luckily, it’s an easy DIY project that you can complete in a weekend, depending on the size and how elaborate the design. Our guide will walk you through the steps you need to know for how to make a bonfire pit in your backyard.
We’ll discuss things to do before you start. We’ll also explore different options of the style of your bonfire pit, based on your intended uses. You’ll learn how to play it safe and get the most out of your project.
Let’s get the ball rolling!
Table of Contents
Step 1: Do Your Homework
We’d be remiss if we didn’t talk about the elephant in the room, i.e, whether you can have a fire in your backyard, legally. Make sure to contact your city and fire department to find out if there are any regulations about recreational, backyard bonfires.
Some areas may forbid them, outright. Other places may require a permit or have regulations about when and where you can have a fire. Contact your homeowners’ association too. Since you’re going to make a hole, you should also call 811 to find out where the utility lines are even with a project as small as a fire pit.
By the way, it’s a free service.
Step 2: Find a Location for Your Bonfire Pit
Obviously, you don’t want to build the pit too close to your house. However, you should also take into account anything flammable around the site, such as fencing, other outbuildings, and playsets. Don’t forget to look above you too to avoid low-hanging branches or power lines. Consider how it fits with your other landscaping features.
Since you’re building something permanent, give it some thought to make sure to choose the right location. After all, there’s a good reason why having an outdoor fire pit is the most popular landscaping element.
Step 3: Decide on a Design
If cost is an issue, you can make a bonfire pit with a simple rectangular or circular design for under $100. You can make it from scratch or work off of a kit. Consider the area around it too.
Would you like a patio around the site to make it more of a focal point?
How much will you use it?
Will you use it for other things like cooking?
Also, consider the size. A pit about 3 feet in diameter will provide plenty of space around it for you and your family.
Step 4: Gather Your Tools and Supplies
You’ll need some garden tools to complete the project, which you likely already have. They include:
- Shovel
- Tape measure
- Level
- Mallet
- Work gloves
- Trowel (optional)
You must also have a tamper, construction adhesive, paver’s sand or pea gravel, bricks for the structure, and a ready-to-use fire pit kit if you’re using one. The advantage of the latter is that you can use it on an existing patio or another fireproof surface.
For a round bonfire pit, you can get trapezoid-shaped pavers that will fit closely together. Rectangular ones are an excellent choice for a square pit. Depending on the height of the bricks, you should plan on three to four levels. That will help keep the fire inside contained to this space and give you a platform for roasting marshmallows or s’ mores.
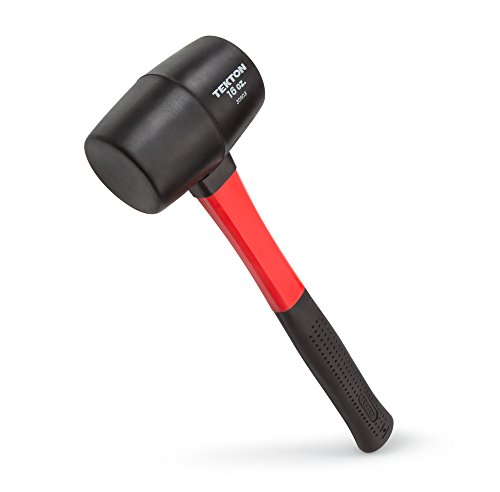
- Double-faced solid rubber head delivers a softened positive strike
- High-strength fiberglass handle core helps absorb vibrations
- Exterior poly jacket protects handle core from missed strikes
- Soft, nonslip rubber grip is a directly integrated piece of the handle that can never pull loose
- Made for construction, woodworking, and automotive applications
Last update on 2025-03-28 / Affiliate links / Images from Amazon Product Advertising API
Step 5: Get the Site Ready
We suggest measuring out the dimensions of your bonfire pit before you start digging. You’re going to go down about 4–5 inches.
If you’re building a round one, an easy way to draw a perfect circle is to put a stake in the center with a length of string of the diameter. Mark the area from this point. Bear in mind that the shape of your bricks will subtract some space from the interior. Measure the diameter if you’re using a kit or bowl insert.
Step 6: Prepare the Base
You have a couple of options here, which will also influence what materials you’ll have to buy. The purpose is to create a fireproof base. You can lay pea gravel in the hole, dampen it with a hose, and tamp it down. You could also lay pavers directly on the ground and fill the gaps with paver’s sand.
Either method should provide a level base on which to place the bricks.
Step 7: Lay Down the First Level
Put down the first level of your bricks into the desired shape. We suggest checking it frequently to make sure that it’s level. Use your mallet to correct the height of any that stick up too far. Make sure they fit snugly together.
Small gaps are okay because that will allow the air to circulate within the bonfire pit to keep it going.

- Patented Verti-site Design: The vial can be read from the side in a confined space, double view vial.
- High Accuracy: 0.029°, machined edges for accurate readings, solid block acrylic vials resist breaking, leaking, and fogging.
- Central magnified vials, UV-resistant magnified center vials for high visibility, and color fading resistance.
- 6061 aircraft-grade aluminum, machined top and bottom surfaces, and advanced structural aluminum frame for maximum durability
- Rubberized end caps protect against shock; comfort grips for ease of handling.
Last update on 2025-03-28 / Affiliate links / Images from Amazon Product Advertising API
Step 8: Continue with the Chosen Number of Layers
Double-check that the first level is level before proceeding with the next one. You might consider staggering the starting point of the next one to make the pit more aesthetically pleasing and to the durability of the structure.
Check and re-check that everything is still level. That will also help to ensure that the fire pit doesn’t topple.
Once the second layer is in place, go back and lift up each brick, putting a dap of construction adhesive on the top of the block on the first level. Continue until you’ve set all of them. Then, move onto the third and fourth rows, if using. Follow the same process of laying the bricks and verifying that it’s level as you go.
Alternatively, you can use mortar to strengthen the structure. Follow the instructions on the package for mixing, using a trowel to level each brick.
Step 9: Put the Bowl Insert in Place (Optional)
If you’re using an insert, now is the time to make sure that it fits. It should feel secure with the weight evenly distributed along the edges of the bonfire pit.
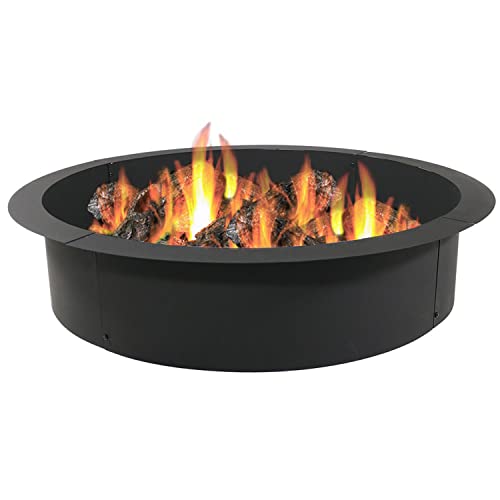
- GREAT SIZE FOR GATHERINGS: This fire ring for outside fire pit can fit many people around it for a gathering in the backyard, lawn, or campground with a 39" inner diameter and a 45" outer diameter. It is 10" H and weighs 32 lbs, making it easy to move to any desired location in the yard.
- BUILT FOR SAFETY AND STABILITY: This round heavy-duty fire pit insert is made of sturdy steel and finished with a high-temperature paint to ensure long-lasting quality and functionality for all weather types and higher resistance to rust.
- EASY TO ASSEMBLE: This large 4-piece metal fire pit liner insert is easy to put together and assembles in minutes (NOTE: There is no bottom to this fire pit liner).
- VERSATILE AND CUSTOMIZABLE: Whether building a rustic stone fire ring or a sleek modern setup, this fire pit kit offers the perfect foundation. Because it can either be used in-ground or above-ground, it seamlessly fits a DIY or pre-built design, providing complete creative freedom for the ultimate backyard upgrade. Add a personal touch by placing landscape blocks or stones around the fire ring (NOTE: Landscape brick and rocks not included).
- WORRY-FREE PURCHASING: Sunnydaze Decor backs its products with a 1-year manufacturer's warranty.
Last update on 2025-03-28 / Affiliate links / Images from Amazon Product Advertising API
Step 10: Fill it Up (Optional)
If you’ve placed your ready-to-use fire pit on an existing patio, you should add about 4 inches of sand to the bottom. That will provide the fireproof base and make it easier to douse out the fire when you’re for the night.
Step 11: Give it a Rest
We’d suggest waiting a day before you start your first fire to give the adhesive or mortar time to set. Then, your bonfire pit is ready to go!
Final Thoughts
Having a fire in your yard is an excellent way to end an evening on a relaxing note. Who can’t help but be mesmerized by the dancing flames? Luckily, learning how to make a bonfire pit in your backyard is an easy and affordable project that is suitable for even the beginning DIYer. All it takes is some pre-planning and the patience to make it level.